

.thumb.jpg.6152adba477e3b6ea81ef9575621c9fc.jpg)
Table of Contents
1. Acknowledgement and disclaimer
2. Introduction
3. Preparation Phase
3a. Briefing
4. Preparing your Squad
4a. Managing Loadouts
4b. Using FIreteams
5. Analysis
5a. Using Sound
5b. Reading the battlefield
5c. Map reading
5d. Communication
6. Non Combat Phase
6a. Mounting up and movement
6b. Engaging the enemy (setup)
6c. Taking initiative and planning ahead
7. Combat Phase
7a. Playing Arma as a squad leader
7b. Controlling your squad
8. Combined Arms
8a. Ground assets
8b. Helicopters
9. Tackling Different Objectives
9a. Overwatch
9b. Approaching a hardpoint
9c. Clearing a town
9d. Clearing a Bunker/Base
9e. Blowing stuff up
9f. Rescuing/Dealing with HVTs
10. Closing Words
11. Change Log
1. Acknowledgement and disclaimer
Thanks to Callistano for the original guide basis and also teaching me and others of the old hand much of what we know.
Disclaimer: While this guide will touch on almost all aspects of Squad Leading in some capacity - it is not the be all, end all holy grail. Experience is the best guide and teacher but Charisma and Respect is something that cannot be taught. You need Knowledge, Experience, Charisma and Respect to be an outstanding Squad Lead which is something we all should strive for.
This is a hard role, there is a lot to manage and understand.
2. Introduction
You need to be familiar with all of the game mechanics is because squad leading is 50% knowledge, and 50% actual leading. If you know how to deal with every single enemy on the battlefield, as well as the strengths and weaknesses of friendly equipment, you will have a MASSIVE advantage over someone who doesn’t. For this reason, if you want to excel as a squad lead, you need to have good knowledge of every other role on the battlefield, including assets. For example, if you know the ins and outs of an LMG, you can then deploy it in a situation where it is the strongest. It also means you will always be able to complete your objective. If you need to blow something up, but no one, including you, knows how to use explosives, then you are straight fucked. There is no shame in learning new things, and this should be a process you are always taking part in.
While core knowledge, procedures, analysis, and mechanics. can be taught or learned. One thing that can’t be taught is charisma. and respect No one can. You can have all the knowledge in the world, but if you do not have the confidence to grab people by the balls and have them listen to you,, this will be an uphill battle that will be constantly difficult. You also need the Charisma to have people want to be lead by you and listen to you as well as the respect to trust in your actions.
3. Preparation Phase
This phase lasts from the moment you load in, until the moment you enter the AO.
3a. Briefing
The above guide will take you through the considerations and questions you should ask as a Squad Lead and the process you go through after. As a foot note - keep the Squad Briefing short, you only need to filter key information so they don't get lost or confused. During the mission it is fully acceptable to repeat the tasking, or whats going on not only for your benefit but the squads. Repeating orders can help focus on whats going on.
4. Preparing your Squad
4a. Managing Loadouts
Getting everybody 7.62 weapons seems like a good idea at first, until you get bogged down during long engagements, because everybody weighs 30+ kg and has massive weapon sway. Keep in mind that the higher the caliber, the heavier the weapon and ammo are and the more recoil you will have. This causes you to be less mobile, unable to carry any additional equipment, and makes you less effective in CQC. But it goes beyond the choice of weapons.
Vehicles being used for transport a lot? Bring Toolkits. Mines or IEDs present? Diffusal Kits. Fortifications and barbed wire likely? Wirecutters
Always bring entrenching tools.
You should always look critically at your objective and decide what equipment is best used to tackle it. Do you need to blow up a lot of stuff? Have more people bring explosives. Is the average engagement range/armor strength higher than normal? Bring MAT instead of LAT because it has a higher effective range and damage. Most of the times, getting non-standard loadouts not only makes your squad more effective, it also makes it more fun for everyone in it, but make sure to double check these decisions with platoon.
4b. Using FIreteams
With the modern template each squad typically has 2 main fireteams. Both fireteams have an Auto-rifleman so the flexibility and usage depends on what the rifleman take in extra equipment - typically who takes the AT and a DMR if it is needed.
- (white) Squad Lead, (green) medic, (red) First Fireteam (Typically with First Team Lead with the second Long Range), (blue) Second Fireteam
Now the reason you should use fireteams is twofold. For one, it tells you and everyone in your squad what the equipment of the people around you is. And the second one is so you can tell a fireteam to go do a job independently, without having to micromanage your squad. Added benefit is that lesser experienced guys can just find their own fireteams and stick with them, even if they get confused.
Fireteams are in essence a miniature squad in the squad itself, under the command and control of the Team Lead. The Squad Lead and Team Leads form an important group that need to be on the same page and work together for things to go smoothly and be successful. Your job as a Team Leader is not just to execute the plan and orders given by the Squad Lead, but also provide alternatives if you have more information due to your forward position.
5. Analysis
5a. Using sound
Using sound is all about finding out about knowing the situation around you without actually poking your head out of cover, or even having any LOS on that position. If you want to do this properly, you need to memorise all of the sounds of all the guns and equipment that are commonly used on the server. All weapons and explosions have their own sounds. Next you need to memorise the distortion that is created when a sound is coming from inside an enclosed space, or from over a hill. Once you know these things, you should be able get a good read on where that sound is coming from.
When you can do all that it is time do something with it. There really is no end to the fun you can have with sound cues. A few of the ways you can utilize it are:
- Hear enemy fire with no friendly return fire? That enemy is uncontested and is trying to kill someone who can’t deal with him. You should get your squad on it.
- Enemy fire with return fire but the enemy was the last one firing? Your ally is probably down or wounded and you need to deal with that ASAP.
- You hear a short burst of enemy fire at a friendly location? Same as above.
- Enemy fire, with return fire and the enemy fire stops? Enemy has been dealt with.
- Hear a BTR in a city but your squad has no AT? Call a CAS strike on it by marking the general location. No need to risk your neck trying to spot it.
- Hear any form of AA fire? Immediately inform FAC about it.
- Heavy caliber gunfire close to your position, but you don’t know it’s exact position? Get your squad in cover before trying to figure out where it is.
There are plenty more examples and the list can continue however this list should give you an idea of how to start thinking with sound if you do not already, but to re-iterate - using sound is very key. It gives you information before your eyes even can and helps you make crucial life saving decisions when applied correctly. Experience is the greatest teacher in this regard.
That being said, Visual confirmation is King. Sound can be deceiving and more so when there is a lot happening in the AO. Use it to prepare yourself for possibilities and help your awareness but nothing will beat the Mark 1 Eyeball. Sound cues will give rough location and what is possibly happening for you to follow up on visually.
5b. Reading the Battlefield
This is normally a job for platoon, but nevertheless it is still a valuable skill to have. Doing this is not really required of Squad Leads on the battlefield, because it is not your job to figure it stuff unrelated to your squad. but it will massively play in your ability to quickly react and be prepared for changing situations as well as taking initiative to help, after all Platoon is just Big Squad - it needs to work together.
If the Platoon Commander is on top of it, this should be automatic for you as you won't need to do it, however that won't always be the case.
Reading the battlefield is all about figuring out the status of objectives, squads, enemy forces, and other things not directly visible to you. It ties heavily into the using sound part of this guide, and builds onto it. Similar to individual sounds, there are a bunch of things you can use:
- Amount of gunshots coming from a certain direction.
- Whether the squad has moved on the map in the last few minutes.
- How responsive they are on the LR.
- The location of a cook off, and if it corresponds with a friendly vehicle.
- Location of smoke, and corresponding location of air asset tag on the map.
- Proximity of air assets to known AA positions.
- Location and LOS of enemy vehicles in relation to friendly forces.
- Explosions in close proximity to friendly forces.
- General progress made by squads over time.
- Friendly equipment.
- LOS of friendly squads.
Linking these different cues to each other can give you valuable info about how battles are going. As you can see, most of these things are based on map markers, so every minute or so, open your map, look at all of the friendly positions, and try to determine their situation. Heard an explosion at a squads location, and the Squad Lead has not responded over LR or moved a few minutes after the explosion? The Squad Lead is probably dead and there is no proper replacement, meaning that squad is combat ineffective until they fix their shit. Enemy tank is sitting about 200 meters away from a squad, and that squad isn’t moving? They are pinned down, either unable to deal with it, or unable to get someone else to deal with it.
5c. Map reading
First comes the importance of map knowledge. If you know exactly where to mark that enemy BTR on the map, not only will it require less communication on the radio, it will also make the assets job that much easier in engaging it. The better you are at reading maps, the easier it will get to predict an entire engagement. Using defilade to only engage one target at a time will save you a lot of unnecessary deaths.
Building on defilade: Line Of Sight! If the enemy can’t see you, you might as well be immortal. Ideally, you want to shoot the enemy before they shoot you. Every time you see an enemy position, open your map and draw an imaginary circle on the area the enemy can see (or you can do it in group chat). Now find the line towards the enemy position with the shortest distance in the circle and the most cover. That can be your basic battle plan.
5d. Communication
Longrange
Because we have 5 squad leaders, Platoon, RTO, FAC, and Zeus on the LR, trying to deal with 5 other things at the same time, it is very important that you KEEP IT SHORT. The process you should follow is "Think, Push, Talk" You need to think about the shortest possible way you can send a message over the LR BEFORE you start talking. A lot of the time all you need is a couple of keywords to get the message across. Next thing you want to keep in mind that not everything needs to be communicated over LR. You don’t need to give a complete report about the situation every 5 minutes. Especially if you are the only squad on an objective, the only communication on LR should be when you have completed it.
Despite these caveats and guidelines, do not be afraid to call for support. Ground and Air assets as well as other squads can only help you if you communicate it and ask for it. They don't know you need help unless you tell RTO/FAC/Platoon etc.
For effective communication, check your messages for the 3 C’s – clear, concise, consistent. Say what you have to say in as few words as possible. Pay attention to the use of filler and buzz words. Resist the urge to over-explain.
The following are examples of all of the frequent conversations you will have with the other elements on the LR:
Getting an order from platoon
- Plt: “Alpha, this is Platoon”
- You: “Send for Alpha"
- Plt: “You need to move up to ~insert pos~, Over.”
- You: “Alpha copies all, Moving. Out.” (alt “Negative, we are suppressed.”)
Giving a sitrep
A sitrep is a very quick explanation of your current situation. This means, in order: Number of casualties, remaining strength, what you are currently doing, any special info.
- Plt: “Alpha give me a sitrep. Over.”
- You: “3 casualties, 5 men left, Currently clearing the town, Zero LAT left. Over”
Getting another squad to do something
- You: “Delta, this is Alpha”
- Delta: “Send for Delta”
- You: “We need your medic on Alpha actual. Over.” (what you need him to do is irrelevant)
- Delta: “Copy. Sending him over, ETA 2 mikes, Out”
Calling in an airstrike
What you want to do here is make the FACs work as easy as possible. They want a marker they can easily transmit to air and they want to know what kind of target it is. Giving it a bright color also helps.
- You: “FAC, this is Alpha, requesting Air support. Over"
- FAC: “Send for FAC”
- You: “Target, MBT on Marker MBT, friendlies are 1 click(Kilometer) Northeast (nearest friendlies), Can mark with Smoke. Over.”
FAC may ask for an alternative marking method, or confirm they want the mark suggested. If Smoke is used, take care not to place smoke on the Target itself as similar to Landing Zones, it will obscure what you intended to direct the CAS on to.
Telling another squad about an imminent threat
Here you can forget about getting the squads confirmation because getting the message out ASAP is more important.
- You: “Break break break (To cut other chatter and signal an important message) Delta you’ve got an MBT coming in from your South, range close”
Shortrange
Every Squad Lead has their own way of handling SR comms, and most of them are okay. The important thing is that SR comms should not interfere with your understanding of the LR. So if you can follow two different conversations at once then all the more power to you. But if not, then you really need to cut that shit down. This part is going to focus on actual communication, not the giving orders part. Depending on the amount of chatter on the LR, you can decide the appropriate radio discipline.
You should absolutely allow your squad to give suggestions about doing something new or different, they may have better eyes and more information or just a different idea - It should just be that though: a suggestion. They can bring up something, and then you can allow it or not. But it should never go further than that. If you deny a suggestion they should not then start trying to convince you to do it anyway. Being firm will resolve any continuation.
Some helpful guides on this topic
6. Non-combat phase
As you might have guessed, you are in this phase whenever you are not directly in combat. You can, however, pretend to be in this phase when the enemy resistance is so low that it doesn’t require any effort to engage them.
6a. Mounting up and movement
The first thing you do before you even get to the vehicle is appoint a driver and gunner. Driver should be someone who knows how to operate the vehicle and someone who can listen to the LR (most vehicles these days have built in LRs). The gunner should generally be someone without a special role, whom you can leave in that seat to provide cover fire. Usually it will be instantly clear what vehicle you need to get into. For example, if there are 7 MRAPs lined up and you are Bravo, you get in the second one. Once everybody is in you drive to the FUP while leaving room for the other squads.
If multiple Vehicles have been given i.e HMMWVs - assign your fireteams and squad members to each respective vehicle before even leaving the briefing area - this saves a huge amount of time at forming up and starting convoys as well as re-mounting after any contacts or objectives.
When formed and when moving call it over Long Range. While BFT may be on, it also may not, communication allows for other squads to be aware of your movements and take that into account if needed.
The driving itself part is pretty straightforward. You keep about 2 seconds space between the vehicle in front of you in case of desync. You can set your speed limit to your current speed with Delete. If you come under fire and are ordered to stop, (this is why the LR part is important) you fishbone the vehicles. This means, if the vehicle in front of you parks on the right side of the road you go to the left and vice versa. If you are in control of two or more vehicles you should always set a lead vehicle and have the rest follow.
6b. Engaging the enemy (setup)
In the end your ability to kill the enemy without taking too many casualties determines your worth as a squad leader. You need to keep all the factors that influence a firefight in mind. Things like amount of enemy forces, armor, emplacements, range to enemy, squad size, squad loadout, general skill, support units, availability and quality of cover, terrain layout, and squad positioning. The only problem with this is that it requires your full attention, and that will never happen.
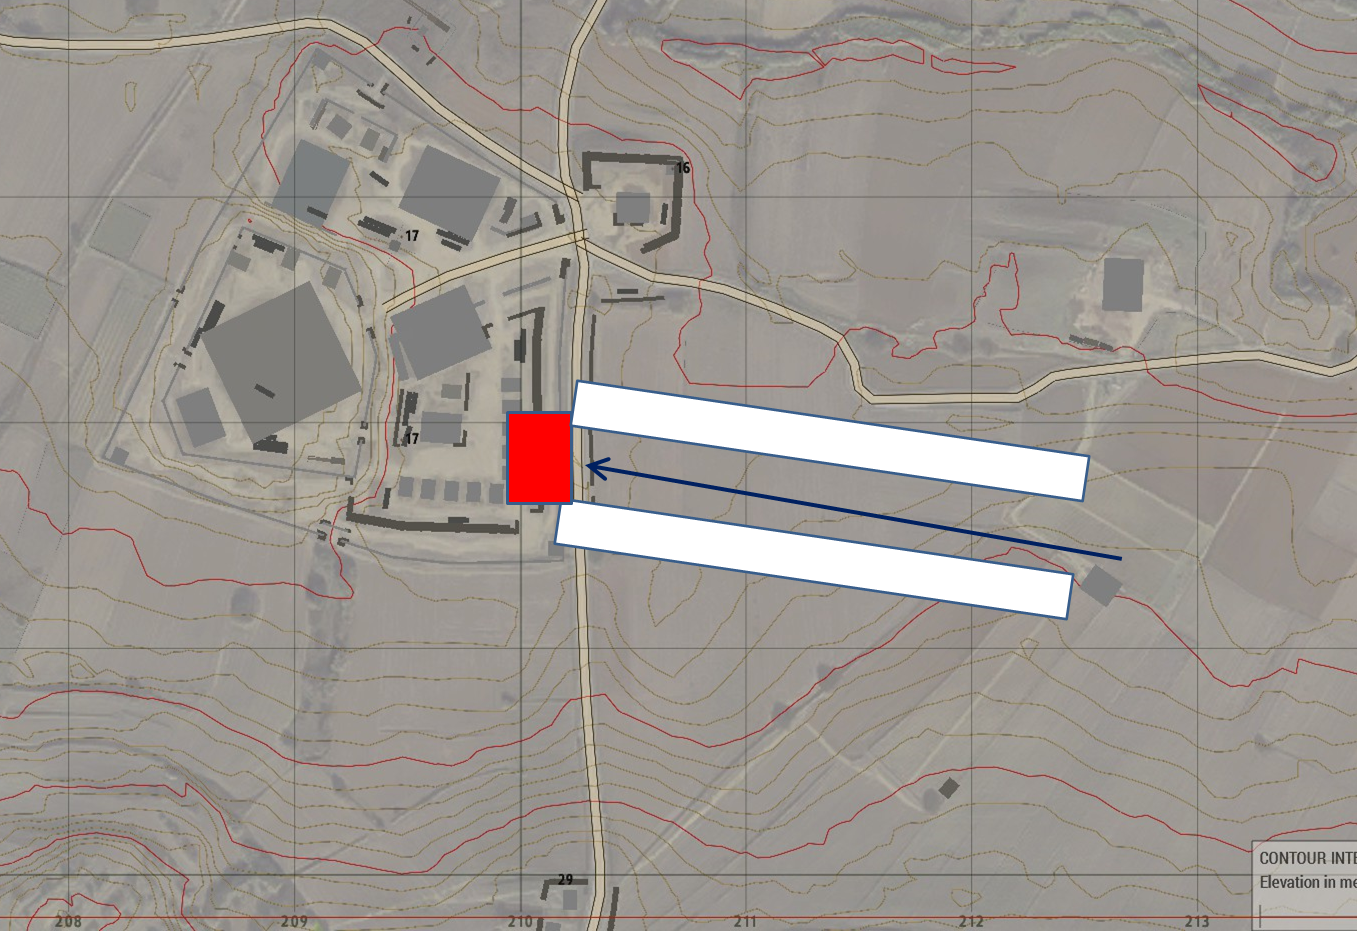
What you really want to do is make it simpler. You need to set up your engagement such that there are as few enemies as possible shooting at you, and the ones that are shooting at you need be the lowest threat level possible. So when you see an enemy position you scan for all of the targets, assign threat level (high to armor and .50 cal emplacements, medium to machine gunners and light armor, and low to other infantry), then you engage the targets high to low. Preferably you should never be in a situation where high threat levels can fire at you. For this you can position your squad such, that you can take out high level threats the instant the engagement starts.
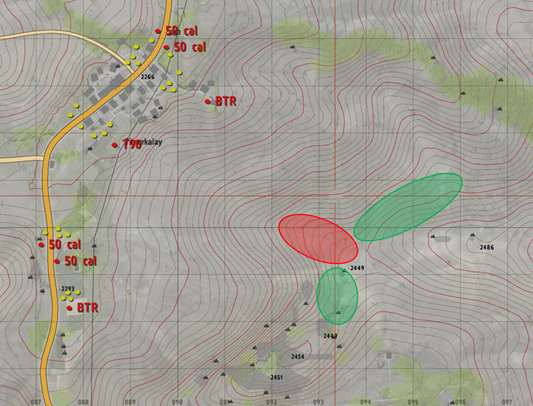
As you can see, in the red area means you will have LOS on both BTRs, 4 .50 cals, and possibly the T90. Trying to setup overwatch here will mean having to take on all these targets at the same time. Most of the time you will die. However, if you set up at a green area you will only have to fight one BTR and 2 .50 cals at the same time. This should be perfectly manageable. Afterwards you can repeat this in the other green area, which leaves you only the T90. Doing the engagement like this you can take on a much stronger force than you would normally be able to deal with.
6c. Taking initiative and planning ahead
One of the key things that makes a Squad effective and fast is the ability for its Squad Leader to plan ahead. take initiative and adjust to rapidly changing situations. Planning ahead is one of the first things you should do and really helps speed up the progress of the Squad.
Taking Vehicles from the start area? Divide your teams into each vehicle, know your mounting order and ensure everyone else does too. Almost finish clearing an objective? Know where to direct the squad next for movement. Always try and be one step ahead of where you are so you are ready to spring from one thing to the next. That being said don't get too caught up in your planning. You do need to be adaptable.
A famous quote for understanding this is over shorthanded as "No Plan survives contact with the enemy"
While Your plan for the Squad or Platoons plan as a whole may be the most perfect thing to ever exist, the enemy can always screw it up. Squad Leaders need the ability to adapt to how things change. On overwatch and being forced off it? Where can you egress safely to, is there another position you can take? A large portion of this is experience and remaining calm and collected during what is going to be some very heated moments. Make a good decision fast, is better than a perfect one later.
The next thing is taking initiative. You really don’t need to get the platoon leaders’ permission for everything. You are free to plan and execute as long as the objective gets completed. That is really the key phrase here: “As long as the objective gets completed.” Some platoon leaders like for their squads to follow the plan to the letter, but sometimes you just need to adapt and improvise to the situation that is in front of you. While this is not free reign to go off and ignore Platoon at every turn, you need to understand when you need to break from the plan due to the situation you are in and deal with it accordingly.
7. Combat Phase
Obviously, this is the phase you will be in whenever shots are fired, either by your squad, or at your squad.
7a. Playing Arma as a squad leader
Playing arma while squad leading is it’s own contradiction. You want to:
- Always be on top of the engagement, lead from the front, get a good look at the enemy, keep an eye on your squad. Generally just be as close to combat as possible.
- Stay alive.
Doing both of these things requires a lot of very quick decision making on your end. While your Fireteam Leaders should be at the front and feeding you information to make these decisions, the quickest will always come from you.
So how DO you do both of those things? The answer is a combination of common sense and using sound as described in the sections above.
- Make sure you have cover available to you.
- Be aware of where the fight is
- Be aware of where your squad fire lines are. Friendly Fire - isn't
The moment you get shot at you dive for cover and never move again for the rest of the mission. Problem solved.
All jokes aside though, as a Squad Lead you should never actively participate in combat. You have better things to do. It’s fine to pop out of cover to give some cover fire every once in awhile, but you should be focusing on making sure your squad is properly engaged, watching the flanks, directing the medic to wounded and unconscious squadmates, or vice versa if a Triage has been established as well as doing all of the other jobs already mentioned in this guide.
7b. Controlling your squad
If you want things to go smoothly then this needs to happen. Controlling your squad comes in two parts: getting your squad to follow orders, and them understanding what you are saying.
Right now you are probably thinking “But Badger, I am the squad lead. Everyone else in my squad only exists to do exactly what I tell them.” And you would be mostly right. But these are not robots; they are human beings with their own ideas about playing the game. As much as it is their responsibility to listen to you, it is your responsibility to make sure you don’t get everyone killed and make the mission fun for them. If they think you can’t do those things, then no one is going to be cooperative. And some people are just dickheads.
As everybody always says: “It’s easy to yell at a squad, but it’s very hard to do it well.” Getting your squad to understand what you are yelling at them, requires more than just a couple of keywords. You need your orders to be both quick to understand, as well as accurate. The time, between you deciding on a task, and them actually doing it, should be as low as possible.
Dealing with idiots
This paragraph is mostly aimed towards the idiots, since the other part is directly related to your skill as a Squad Lead. When giving orders you want everyone to follow those orders immediately and exactly. You should NOT tolerate any backtalk. No buts, no complaining, within reason of course.
We are FK, a little bit of fucking around should be possible, but it is up to you where to draw the line. If they do give you shit and you made it clear that it is neither the right place nor tolerated, you give them one warning before you get them kicked. If you give a move order and they don’t follow, you LEAVE THEM BEHIND. You do this a couple of times and no one will think twice about doing what you say. This may seem harsh, but you do not have the time to be arguing with people over orders in a firefight. If they have constructive suggestions they can bring it up if the situation allows it.
WIth all this in mind, the key thing is to also use the structure the community has in place. If this people are causing disruption and issues during missions, report them to the Staff.
Calling out targets
The fastest way to call out an enemy is to give a bearing and a range (i.e. “enemy infantry, bearing 135, 200 meters”) but this is not the best way. Not only is the bearing not going to be the same for everyone, most people don’t have the bearings memorized, so it will take them a couple of seconds to find it.
Additionally causing people to tunnel vision on that bearing. The better way is to make the call in such a way, that they can follow it as you are saying it. Start by calling out the type of target (i.e. “enemy infantry” or “BTR”) so that they know which kind of weapon they need to grab. Followed by the rough compass direction (like “Southeast”) to get everyone looking in roughly the same direction. Then you give a rough estimate of the range (i.e. “200 meters”, “1 click out”) so people can estimate the bullet drop. Lastly you give the location in relation to an obvious landmark (“left side of the ATC”) to finalize the call and give the exact position. This takes a bit longer to say but you will guarantee that your squad can engage the moment you finish your call.
In general Contact reports should be standardised like this: 1. "CONTACT", 2. Direction, 3. Description, 4. Range Estimate
e.g. "Contact, South, BTR, medium range"
Move orders
This is a tricky one. Positioning and repositioning in the middle of combat is one of the most important and dangerous things in arma. If you give your squad a wrong move order, and they walk into enemy fire, no amount of skill is going to unfuck them. There are a couple of ways to combat this.
- Avoid open spaces. use the ‘2 seconds from cover’ rule when moving around in combat. You should always be close enough to cover that you can dive out of the way of enemy fire.
- Move cover to cover. This one especially useful in forests. You allow your squad to fire from cover to kill any direct threats. Then, once they stop taking direct fire, they move to the next cover to engage other enemies, or help allies who are being suppressed. Cover to cover movement helps in not getting bogged down by one, or a few enemies, and creates a form of bound movement, although not as effective.
- Smoking open areas. Although it’s best to only use smokes defensively, when you are in trouble, cutting of certain LOS on enemies might drastically improve your ability to kill other targets.
Other than that, you don’t want to micromanage your squad's movement in the middle of combat. What you need to pay attention to is that people don’t get separated from the rest. For this you can indicate certain areas you want them to be in, and repeat move orders multiple times if it is critical to do so. Here it is also important to have fireteams stick with each other. They will keep track of each other for you. Then if you give a fireteam an order that separates them from the rest of the squad, if necessary, make somebody the leader of that team.
Being decisive
One of the major difficulties that inexperienced Squad Leads have is making fast decisions. Quite a few people shut down because they don’t know the perfect solution to a problem. But giving the perfect orders is vastly overrated. Giving a decent order really fast is way more important than a perfect order that is too late. Don’t be afraid to just yell the first thing that comes to mind.
Something closely related to this is strictness. Yes are FK, but any good Squad Lead’s will still require a degree of professionalism from the squad. In practice this means that any decision you make gets followed to the letter. Any order gets followed immediately without complaining. People don’t agree with you? Tough .
The problem that immediately pops up of course is that you get the risk of turning your squad into the NO FUN ALLOWED squad. So really you want to find a nice balance between having fun and fucking around, and performing well as a squad. Drawing the line between these things is up to you. It does really depend on your squadmates though. If you have people in your squad that you know well and are good at Arma, then you can joke around in the middle of combat because they know exactly that even though you make jokes, you still want them to do exactly what you tell them. However, if you have a lot of new people, or people who are unfamiliar with listening to orders (this is not a redundant statement), then you need to cut off the jokes a lot earlier.
Again to be good in this role, you need Charisma and Respect, without it the relationship between you and your squad just won't work.
Murdering the Enemy
The second most important thing is suppression. Infantry that is properly suppressed will stay on the ground, be less responsive to being flanked, react slower, and be less accurate. So really you want them to be suppressed at all times. This is less of an issue now with the massive amount of people on the server and the relative low amount of enemies, so in most cases it will be more efficient to go for kill shots.
Insert murder
8. Combined Arms
Advanced combined arms combat is the staple of modern warfare. It can also be a massive pain in the ass to do correctly. Mostly because your squishy mortal bodies don’t like shrapnel, big calibers, and pressure waves, and most of the ground assets are blind in CQB situations.
8a. Ground assets
For the ground assets I’m going to be solely focusing on MBT’s since all of the things beside overpressure also apply to other vehicles. Speaking about overpressure, it’s probably the biggest cause of drama between infantry and assets. You can see the overpressure range below.
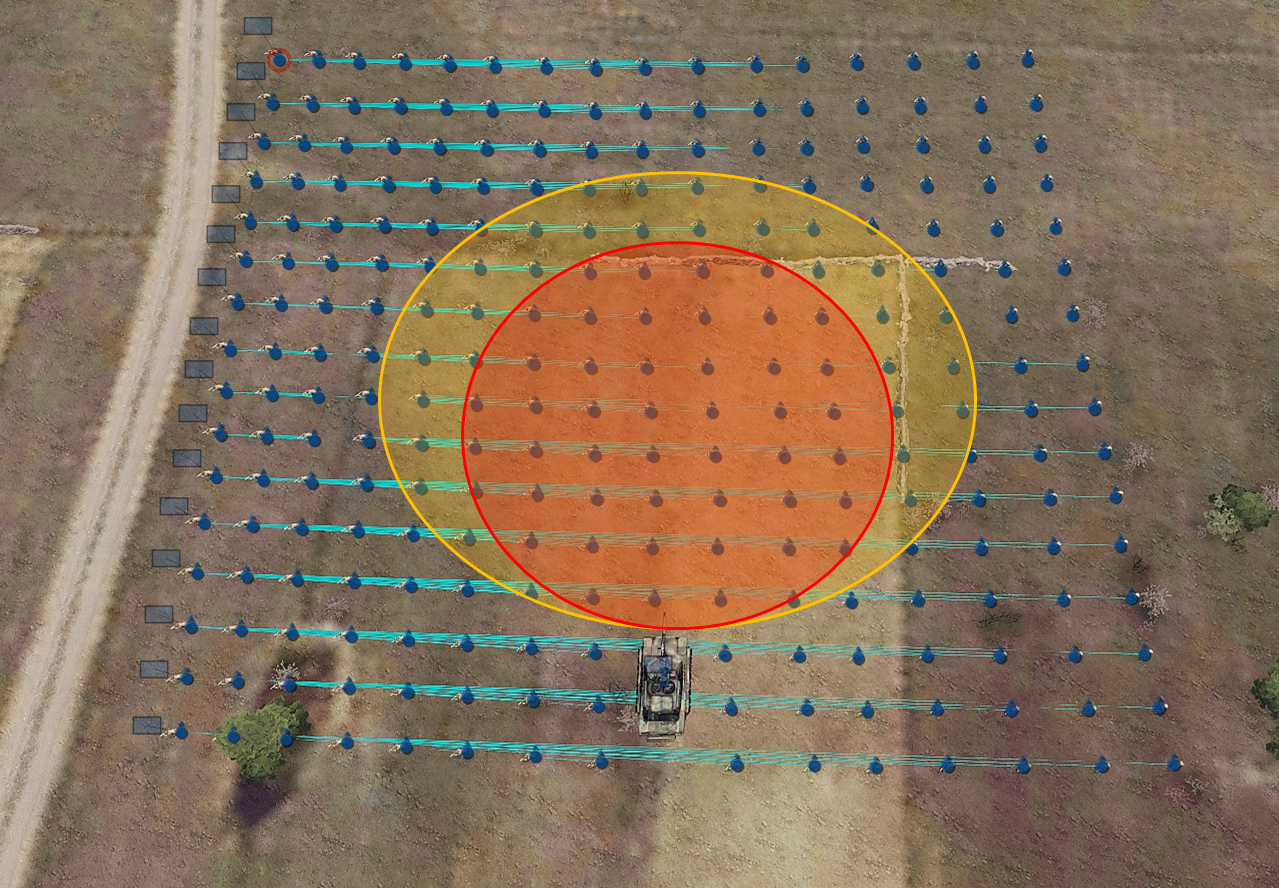
As you can see, the range is FUCKING MASSIVE. The exact range may differ slightly from tank to tank (sometimes it is also a little bit behind the tank). Because of that it really is in your best interest to stay the hell away from it. (Quick point to assets: We can’t instantly evac an area you want to be in, so please don’t just drive up behind us.) On top of that, there is also a small pressure area around the shell itself. Another thing to note is the green area. This is meant as an area that the tank uses to retreat to after firing. When they get engaged by heavy armor and they fired the cannon they will NOT wait for you to get out of the way, and they never should.
Next up is the fact that the MBT is mostly blind. They have permanently zoomed in sights, so they are really dependent on you to clear the area around them from enemy AT soldiers. Engagements with assets in close range should look like this.
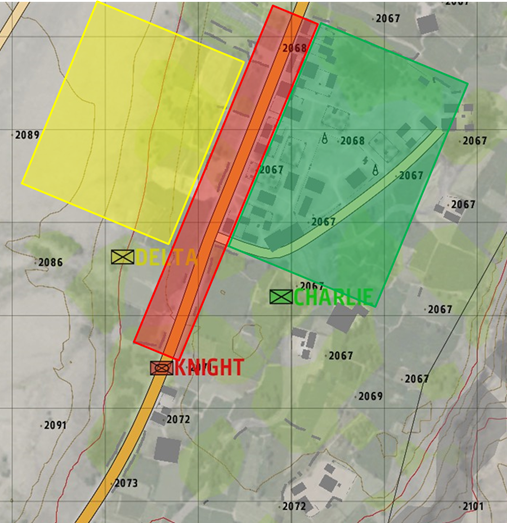
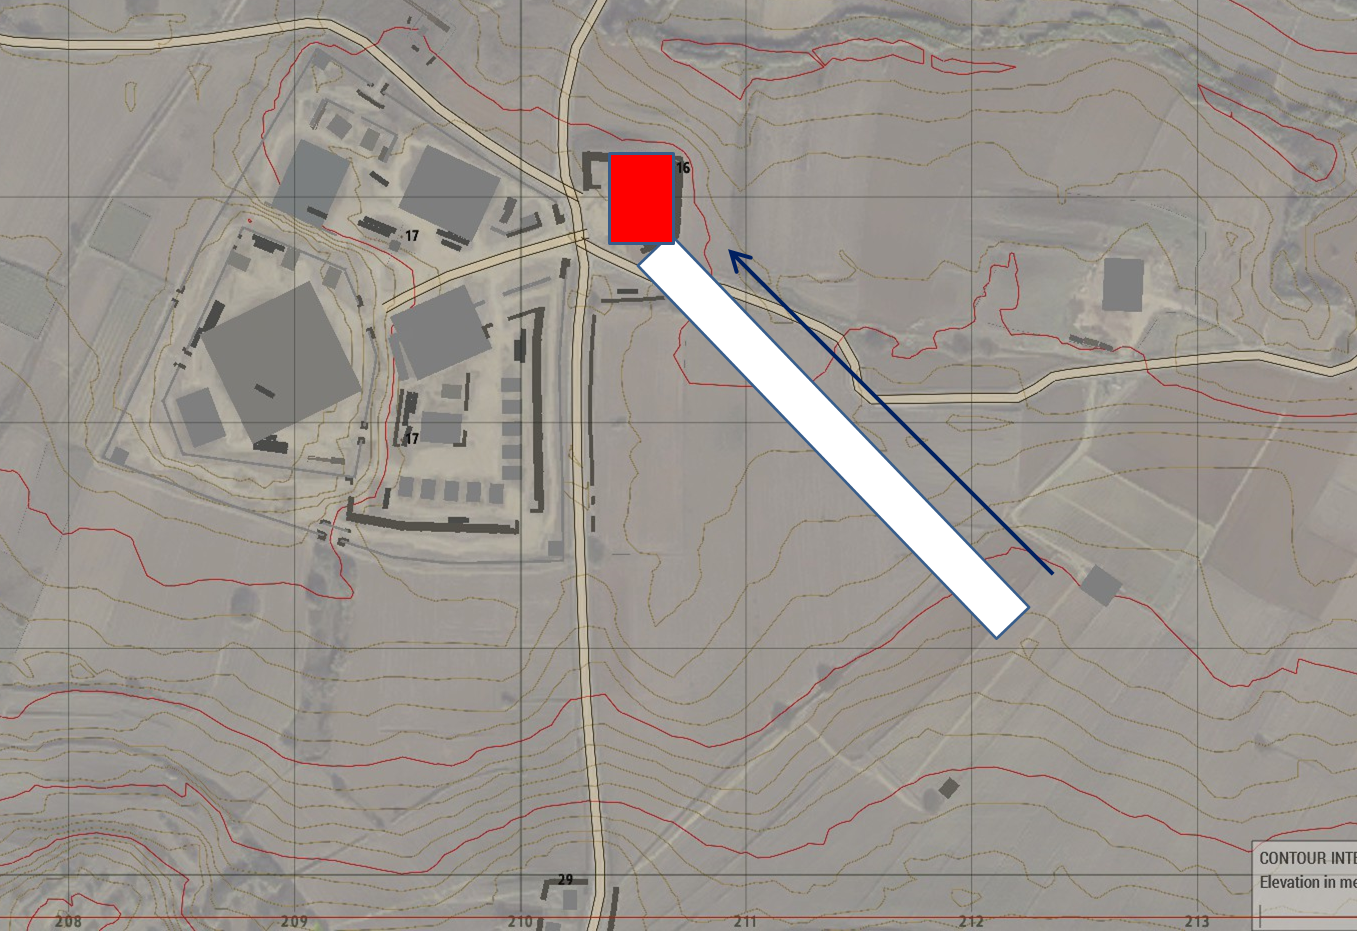
In most situations you want to simply leave the main road to the tank. They will deal with any armor reinforcing the area (enemy vehicles always need to come down the main road), as well as engage soft targets on it. This means you don’t have to worry about it and therefore should never be on said road. In non-standard situations it is only important that you properly clear the area before moving on. In these cases it is Knight’s responsibility to maintain about 100m distance behind your squad. As you can see there are some houses that are in Knight's area. These are houses you can clear, as long as you don’t exit onto the main road. HOWEVER if Knight decides to roll up next to these houses before you cleared them, then you can no longer enter them. If an AT soldier in that house then decides to kill Knight, that is entirely not your problem.
While we are on the topic of Knight vs. Squad, you should consider Knight to be equal to a squad in both importance and firepower. Practically this means that neither of you should be ordering the other around. It also means that, if they fuck up and get flanked, you shouldn't be sacrificing your squad to try and bail them out. And of course the opposite also applies. Lastly both parties need to learn to stay out of each others way to avoid overpressure death.
8b. Helicopters
Working with air assets on the other hand is an entirely different manner. Helicopters, as you might have guessed, are fragile as fuck. They don’t like staying on the ground in the middle of a battlefield for any longer than they absolutely have to.
Cineafx has an excellent guide of procedures for the Infantry when dealing with Transport helicopters and best practices.
One aspect that is not mentioned is the marking of the LZ with smoke. If you do that make sure the smoke will not obstruct difficult terrain or object for the bird (e.g. Power Lines, Large Rocks) and communicate the deployment and colour of the smoke to FAC. Deploy smoke when you can hear the Heli otherwise it may expire before the bird gets a visual on you.
9. Tackling Different Objectives
9a. Overwatch
Being in overwatch is all about range to target. The things you should be keeping in mind are different by range.
- 0-100m: What are you trying to overwatch?
- 100-200m: enemies will zero in on you in a couple of seconds. Prioritize closest targets first, always be in some kind of cover, trenches are required.
- 200-300m: enemies take about 10 seconds to get accurate. Good cover still required. With proper suppression you can take on large groups of enemies.
- 300-400m: At this point enemy accuracy really starts to suffer. This is generally the ideal engagement range since your squad is still accurate. As long as you have good cover you can sit on overwatch indefinitely.
- 400-600m: Mostly the same as above, just that your squad will not be as accurate and thus waste more ammo than usual.
- >600m: At this point you are hitting the maximum effective range of standard rifles. You will waste a massive amount of ammo killing anything more than a couple of enemies. Above this range you don’t even have to use cover anymore since enemies won’t spot you.
The big exceptions to this are armor, emplacements, and anything that fires explosives. BTRs and static emplacements will, because of the lack of recoil, have pinpoint accuracy up to 500m, and pretty good accuracy up to a 1000m. The explosive rounds are kinda self explanatory.
9b. Approaching a hardpoint
A hardpoint can be a location that has many defences, This can be in any form, be it infantry, emplacements or other things. These points are a very common thing in our missions since they are easy to build. Generally doing an approach can be done in two ways.
- Set up a short overwatch on one side of the harpoint to kill everyone with a direct LOS on your approach. This is a perfectly fine method for the way the AI works now on our server, because the AI is quite static. However, when there’s a lot of AI moving around this might no longer be viable.
- Smoke your way up to the hardpoint while killing a minimal amount of enemies. This works best when there is a large force defending it that you cannot engage from overwatch. Doing it the standard way of throwing a line of smoke and running through it does, however, create one major problem. You end up throwing smoke on top of enemies, and you should NEVER THROW SMOKE DIRECTLY ON ENEMIES. (of course, if it’s an unprotected wall, then this doesn’t matter) The smoke needs to be thrown as such that you always maintain LOS on the part of the hardpoint you are running up to and taking cover behind. There are two ways of doing it:
The corner method
The tunnel method
9c. Clearing a town
Clearing a settlement filled to the brim with angry guys wielding AK’s is IRL your worst nightmare. In Arma, it’s still a giant pain in the ass. This is mostly because of the massive amount of corners enemies could be hiding in, and the relatively low visibility. So any strategy should be based around minimizing the amount of corners you can be shot from at any time. In this case, you should be clearing the area in a single line. This can also be applicable with multiple squads.
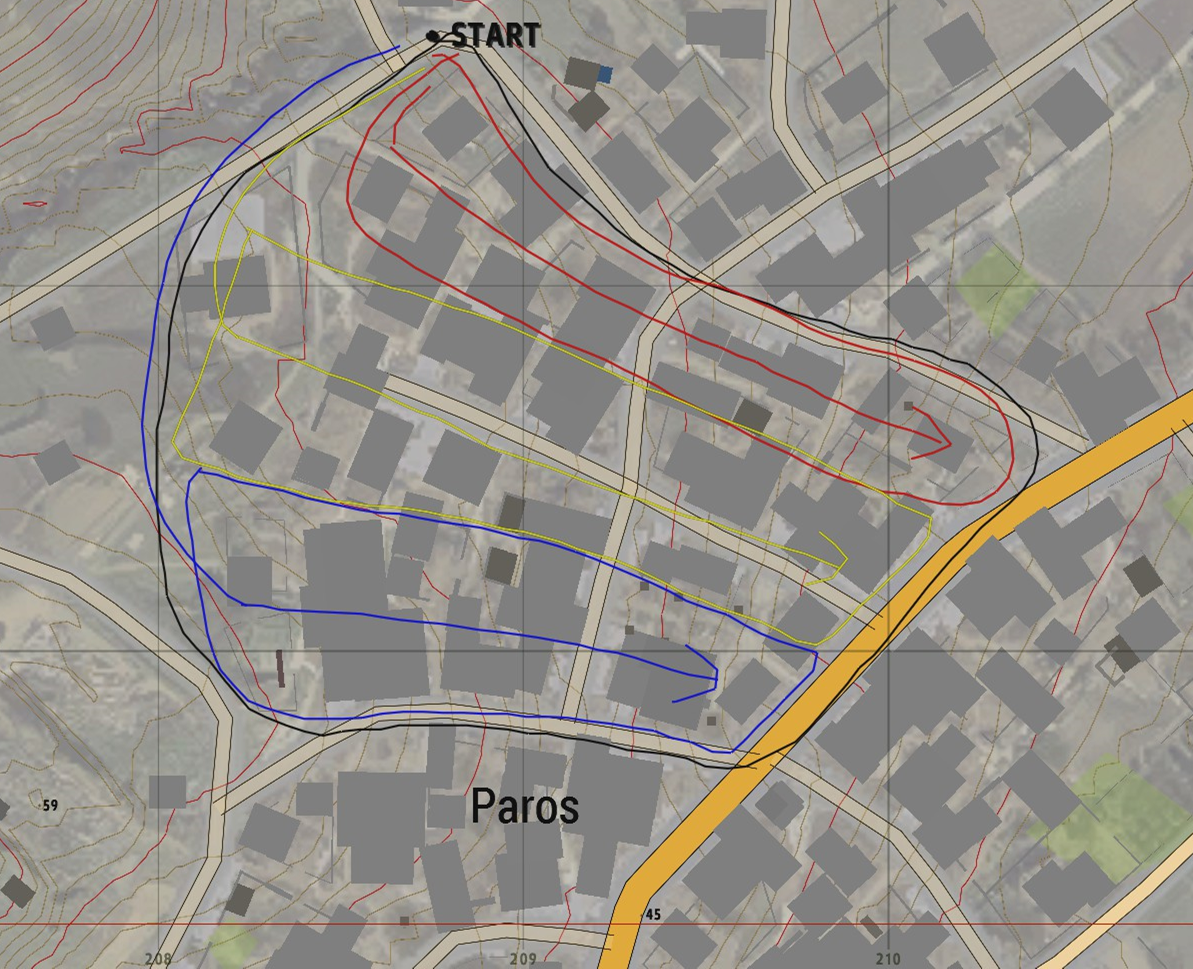
As you can see, the area has been divided into columns. Every fireteam gets his own column. Now for this to work properly, every fireteam needs to stay parallel to each other. The best way to track and control this is to track the marked buildings on your map. You can then tell the fireteams to hold when they get too far ahead of the rest.
9d. Clearing a Bunker/Base
Under a bunker or base, count basically any walled compound with only one or two entrances. Because of the nature of these structures try to be the only squad clearing because that gives you more freedom. Bunkers usually contain a couple of hardpoints and chokepoints.
Make liberal use of grenades to clear these points. After you have gained entry, immediately set up one of your Fireteams at the entrance to cover your back. This way you won’t get flanked by enemy stragglers around the base. From this point on you can clear them much like you clear a town. When you encounter any corridors, have your team split 50/50 in two columns on each wall (This also applies to roads).
9e. Blowing stuff up
Again, you want to be the only squad around when doing this.
- If not, tell the other squads to clear away from the objective before planting anything.
- Put your squad in a location where they are outside of the blast radius, but can still cover the areas with direct LOS on the objective.
- Have your explosive specialist do their thing. Preferably you only want one guy doing the planting, but having a max of one extra guy planting should still be possible.
- Have your guy (or guys) tell you when he’s placed the last explosive.
- If any squads are still around, tell them over LR that they have 30 seconds to clear the area, trigger after the 30 seconds. If no one else is around, your guy can trigger as soon as he’s clear.
- Fuck everyone still close to the objective.
9f. Rescuing/Dealing with HVTs
Approaching hostage situations relies on one question: do you know exactly where all the hostages are? If you do, then you can treat it almost like a normal combat mission, as long as you make sure no grenades are used in the vicinity of the hostages. If you don’t, however, then it becomes a whole different problem.
Before you go in (or when you are going in) there are a bit of prep work you should do:
- Designate a “no grenades” area. This is usually the base the hostages are located in, but you can also simply draw a box around the area you don’t want any grenades in.
- Make sure your squad is properly informed about the nature of the hostages (civilians, military uniform, sometimes even enemy soldiers)
- If the hostages are spread out, set up a collection point for the hostages. This makes it easier to keep track of them, as well as defend them.
After this you can start clearing. Only important thing: be thorough! Normally it will not be important to check every little corner, but hostages can’t defend themselves. So even a single enemy can kill all of your precious hostages in seconds.
10. Closing words
As mentioned in the introduction - this is not the be all - end all guide to Squad Leading. But this and the other materials linked should give you a good base to becoming a good Squad Leader from not doing it before. It takes time, effort, experience and most importantly Charisma and Respect.
This is one of the hardest roles to take. You are a cog with a lot of smaller moving parts but part of a much bigger machine, and those smaller parts of you are people you need to wrangle and organise. Be objective when analysing yourself, try and constantly learn and improve.
11. Changelog
v2.1 - 22/05/2020 - Fixed some minor issues and made some additions and corrections thanks to @Silberjojo feedback
v2.0 - 21/05/2020 - Reformatted and updated the guide to more modern standards with the Squad Layout changes.
-
 1
1
-
 2
2
-
 8
8


